


Painting a ceiling ranks among the most challenging DIY home improvement projects. Whether you’re tackling a standard ceiling, dealing with popcorn texture, or facing the intimidation of high ceilings over stairs, the right technique makes all the difference between a professional finish and a frustrating mess of drips and roller marks.
South Florida homeowners face unique ceiling painting challenges. Many newer homes feature vaulted ceilings and two-story entryways that reach heights of 18-24 feet. Combined with our humid climate that affects drying times, ceiling projects require careful planning and the right approach.
Understanding Different Ceiling Types
Before you begin painting, identify what type of ceiling you’re working with. Each surface requires different tools and techniques.
Smooth Flat Ceilings
Standard 8-10 foot ceilings with smooth drywall represent the most common surface. These ceilings accept paint evenly when properly prepared, though they show every imperfection and roller mark if technique falters.
Popcorn Ceilings
How to paint popcorn ceiling surfaces requires extra patience. The textured surface drinks paint quickly and demands a thick nap roller to reach into crevices. Many South Florida homes built before 1990 feature this texture, which served both decorative and acoustic purposes.
High Ceilings and Vaulted Designs
Modern Florida homes showcase dramatic ceiling heights. How to paint high ceilings safely becomes the primary concern. Two-story foyers, great rooms with cathedral peaks, and open-concept designs create stunning spaces but present serious safety challenges.
Stairwell Ceilings
Learning how to paint a stairwell ceiling or paint high ceilings over stairs requires specialized equipment. The uneven floor levels and confined space make ladder placement difficult. Many homeowners attempting this project realize mid-job they need professional help.
Essential Tools and Materials
Success starts with having the right equipment. Ceiling paint work demands specific tools that make the job safer and produce better results.
Extension Poles
An extension pole transforms ceiling painting from neck-breaking torture to manageable work. Quality poles extend 4-8 feet and lock securely. Telescoping poles adjust to different ceiling heights, essential for homes with varying levels.
Ladder Safety for High Spaces
For high ceilings, you’ll need more than a standard 6-foot ladder. A-frame ladders rated for your weight plus 50 pounds provide stability. Extension ladders work for stairwell access but require two people for safe positioning.
Many professionals use scaffolding or ladder levelers for staircase work. Ladder levelers attach to standard ladders, compensating for uneven stair surfaces. Adjustable legs create a level platform on stairs where traditional ladders fail.
The Right Roller Makes the Difference
Ceiling paint rollers differ significantly from wall rollers. A 9-inch roller with thick nap (3/4 inch for popcorn, 1/2 inch for smooth) holds more paint and covers faster. The roller cage must grip firmly on your extension pole to prevent dangerous disconnections mid-project.
Cheaper rollers shed fibers that stick to fresh paint. Invest in quality rollers that maintain shape after multiple loads. Your ceiling coat will thank you.
Painter’s Tools for Edges and Corners
Corners where walls meet ceiling require an angled brush. A 2-3 inch angled sash brush cuts clean lines without tape. For beginners, painter’s tape creates boundaries though removal before paint fully dries prevents peeling.
Preparing Your Space
Proper preparation prevents most ceiling painting disasters. Rushing into painting without protecting your space and preparing the surface guarantees problems.
Protect Everything Below
Ceiling paint drips. Period. Accept this truth and plan accordingly. Cover furniture completely with plastic sheeting, not just old sheets that paint soaks through. Move smaller items out entirely.
Drop cloths should overlap and tape to baseboards. Canvas drop cloths absorb drips better than plastic, which becomes slippery. For large projects, use both: plastic sheeting over furniture, canvas on floors.
Don’t forget light fixtures. Turn off power at the breaker, remove fixtures or wrap them carefully. Ceiling fans must come down or wrap completely in plastic.
Ceiling Surface Preparation
Clean the ceiling before painting. Dust, cobwebs, and grease prevent paint adhesion. A long-handled duster followed by light washing with TSP substitute removes buildup. Let the surface dry completely in our humid Florida climate—run air conditioning to speed drying if needed.
Repair any damage first. Fill cracks and holes with spackling compound, sand smooth when dry. Previously painted ceilings with peeling areas need scraping and priming. Bare wood or new drywall requires primer before ceiling paint.
Water stains from leaks must be sealed with stain-blocking primer or the brown marks will bleed through. Fix the leak source first or you’ll repaint sooner than you’d like.
Room Ventilation Planning
Paint fumes concentrate at ceiling height. Open windows create cross-ventilation. Position a box fan in a window blowing outward to exhaust fumes. Our South Florida heat makes this challenging—plan to paint in morning hours when temperatures stay cooler.
How to Paint a Ceiling: Step-by-Step Process
With preparation complete, follow this proven method for professional results.
Step 1: Cut In the Edges
Begin painting at corners and edges where the ceiling meets walls. Load your angled brush moderately—too much paint drips, too little requires multiple passes that show brush marks.
Work in 3-4 foot sections, maintaining a wet edge. The goal is smooth coverage that blends into rolled sections. If using tape, apply it carefully along the wall-ceiling junction, pressing firmly to prevent paint bleeding underneath.
Step 2: Roll the First Coat
Pour ceiling paint into a roller tray, filling the deep end. Load your roller evenly by rolling back and forth several times. Don’t oversaturate—excess paint creates drips and uneven coverage.
Starting in a corner, roll in a “W” pattern across a 3×3 foot section. This method distributes paint evenly and helps avoid roller marks. Then fill in the “W” with perpendicular strokes, blending the area smoothly.
The best way to paint a ceiling without streaks involves maintaining consistent pressure and keeping a wet edge between sections. Work systematically across the ceiling, slightly overlapping the previous section before paint dries.
Step 3: Managing Drips
Despite best efforts, drips happen. Catch them immediately with your brush or roller. Once dry, drips require sanding and touch-up. Watch for paint accumulating on roller edges—this signals overloading.
Ceiling paint thins can help achieve the right consistency. Florida’s humidity sometimes requires slight thinning for smoother flow, though too much reduces coverage. Follow manufacturer’s instructions carefully.
Step 4: Apply the Second Coat
Let your first coat dry completely. Touch-dry feels dry but the paint surface remains vulnerable. Wait the full time specified on the paint can—typically 2-4 hours minimum, longer in humid conditions.
The second coat should roll easier since you’re painting over sealed surface. Maintain the same systematic approach, though you may need less paint for full coverage.
Step 5: Final Inspection and Touch-Up
Once the second coat dries, inspect under good lighting. Look for thin spots, missed areas, or imperfections. Touch up with a brush or small roller, feathering edges to blend.
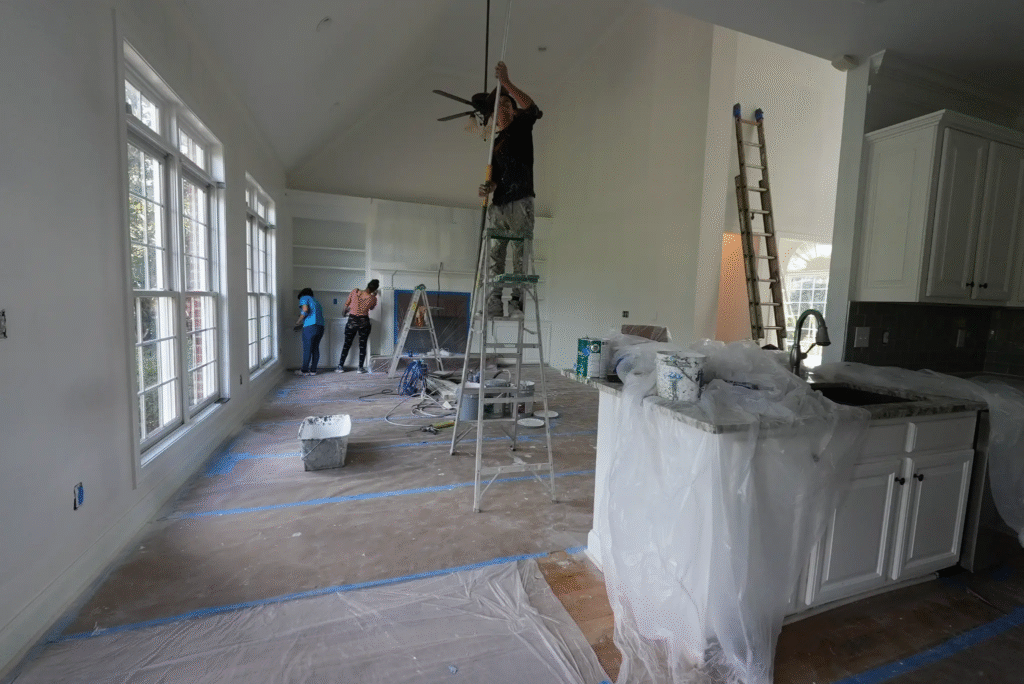
Painting High Ceilings Safely
How to paint high ceilings demands respect for heights and safety equipment. Many DIY projects turn into professional calls when homeowners realize the danger.
Scaffolding vs. Ladder Systems
For ceilings above 12 feet, consider scaffolding. While more expensive to rent, it provides a stable work platform that lets you move comfortably. Baker scaffolding, also called scaffold towers, assembles to various heights with a solid deck top.
Extension ladder work requires a helper for positioning and someone watching below. Never use a ladder beyond its rated height. The top cap should extend 3 feet above your landing point.
Special Considerations for Vaulted Ceilings
Vaulted ceilings angle from low to high, creating awkward painting positions. You’ll need multiple ladder positions or adjustable scaffolding. The extreme height means any fall becomes serious.
Paint high walls leading to vaulted peaks first, working upward. This prevents dripping onto completed work. Many Florida homes combine vaulted ceilings with large windows—painting around these requires extra care.
When to Call Professional Painters
Professional painters own specialized equipment designed for high ceilings. Adjustable scaffolding systems, extension ladders rated for commercial use, and experience working at heights make dangerous projects routine.
If your project involves:
- Ceilings over 15 feet
- Stairwell ceilings with complex angles
- Multiple high ceiling spaces
- Lack of proper safety equipment
- Physical limitations that affect balance
Consider hiring professionals. Paint Pro South Florida specializes in high ceiling projects throughout Broward and Palm Beach counties. Our teams complete safely in days what homeowners struggle with for weeks.
Special Techniques for Popcorn Ceilings
Popcorn ceiling texture requires modified techniques. The bumpy surface creates unique challenges.
Spray vs. Roll Application
Spraying popcorn ceilings covers faster and more evenly than rolling. However, spray equipment requires skill, and overspray creates enormous mess. Extensive masking becomes necessary—every wall, window, fixture, and surface needs protection.
Rolling remains the safer choice for most DIYers. Use a thick nap roller (3/4 inch minimum) and load it well. Work slowly to push paint into all the texture crevices. Expect to use significantly more paint than smooth ceiling coverage estimates.
Avoiding Texture Damage
Pressing too hard when rolling can damage popcorn texture, pulling chunks loose. Let the roller’s weight do the work. If texture begins detaching, stop and evaluate. Damaged popcorn ceiling often requires professional repair.
Older popcorn texture may contain asbestos. If your home was built before 1980, test before disturbing the texture. Asbestos abatement requires licensed professionals—this is not a DIY situation.
Paint Selection for Ceilings
The right ceiling paint makes application easier and results better.
Flat vs. Sheen Finishes
Flat or matte finish remains standard for ceilings. The non-reflective surface hides minor imperfections and doesn’t highlight roller marks. Glossier finishes show every flaw and create glare from lighting.
However, flat paint doesn’t clean well. In humid Florida bathrooms and kitchens, consider satin finish or special moisture-resistant ceiling paint. These cost more but prevent mildew and allow wiping without damage.
Color Choices
White ceiling paint brightens rooms and makes spaces feel larger. Most homeowners choose pure white or very light neutral tones. Ceiling paint formulated specifically for overhead application flows smoother and spatters less than wall paint.
Some designers advocate matching ceiling and wall colors for visual height. This works in spaces with high ceilings but can make standard 8-foot ceilings feel lower.
Quality Matters More on Ceilings
Premium ceiling paint costs more but offers better coverage, easier application, and longer life. Quality paint requires fewer coats, saving labor that offsets higher material cost. Better paint also resists yellowing in our Florida sunshine.
Brands like Benjamin Moore, Sherwin-Williams, and Behr all produce excellent ceiling formulations. Check with your local Paint Pro South Florida location for product recommendations specific to South Florida conditions.
Common Mistakes to Avoid
Learn from others’ errors rather than making your own.
Skipping Primer
Bare drywall or repaired areas must be primed. Primer seals the surface for even paint absorption. Without primer, you’ll see darker patches where fresh drywall drinks paint differently than existing surfaces.
Stain-blocking primer costs more but proves essential over water stains or strong colors you’re covering.
Overloading the Roller
Beginners often load rollers too heavily, thinking more paint means better coverage. Instead, excess paint drips continuously and creates uneven thickness. Load moderately and make more trips to the tray.
Working in Wrong Conditions
Don’t paint ceilings during humid weather if avoidable. High humidity slows drying dramatically, increasing drip risk and extending the project. Run AC to reduce humidity and improve ventilation.
Avoid painting in direct sunlight if natural light enters. While good lighting helps you see, sunlight heats the ceiling and causes paint to dry too fast, preventing proper blending.
Ignoring Safety
Falls from ladders cause thousands of injuries yearly. Never stand on the top two rungs. Don’t lean to reach—reposition the ladder. Wear shoes with good traction, and keep your phone nearby for emergencies.
If you feel unstable at any point, stop and get help. Professional painters have insurance and safety training for a reason.
Maintenance and Touch-Ups
After your hard work creates a fresh ceiling, maintain it properly.
Cleaning Painted Ceilings
Dust ceilings regularly to prevent buildup. Flat paint shouldn’t be washed, but gentle vacuuming with a brush attachment removes dust and cobwebs.
For kitchens and bathrooms with satin finish, occasional wiping with a damp sponge maintains appearance. Avoid harsh chemicals that damage paint.
When to Repaint
Properly painted ceilings last 10-15 years in good conditions. Repaint sooner if you notice:
- Yellowing or discoloration
- Peeling or bubbling
- New water damage
- Smoke damage or strong odors absorbed into paint
Professional Painting Services in South Florida
While DIY ceiling painting saves money, it demands time, physical ability, proper equipment, and tolerance for frustration. Many homeowners start a ceiling project only to call professionals partway through.
Paint Pro South Florida serves communities throughout Broward and Palm Beach Counties, including Plantation, Coral Springs, Hollywood, and surrounding areas. Our experienced teams complete ceiling projects efficiently with professional results.
We handle everything from standard room ceilings to complex high ceiling installations. Our painters own the specialized equipment needed for safe work at any height, and our insurance protects your home throughout the project.
For spaces with high ceilings, vaulted designs, or challenging stairwell areas, professional painting eliminates danger and frustration. We provide free estimates—contact us to discuss your ceiling painting project and receive an accurate quote.
Whether you tackle the project yourself or hire professionals, a freshly painted ceiling transforms your space. Clean, bright ceilings make rooms feel larger and more welcoming. With proper technique or the right professional help, you can achieve beautiful results that last for years.
Ready to transform your ceilings? Contact Paint Pro South Florida for a free estimate. Our expert painters serve Broward and Palm Beach Counties with professional ceiling painting services at competitive prices.